Are you searching for a way to keep your favorite fleece blanket properly? Well, then you are at the right place. We are going to give you some tips on how to wash and tie a fleece blanket. Fleece blankets are a very cozy option on a cold day.
They are used in body oils, hair products, food, and spills, and if you don’t wash them properly, they will pill and quickly lose their shape. So, here are specific ways through which you can keep your fleece blanket cleanly and properly.
How to Wash a Fleece Blanket?
Pre-Treat Stains
Treat stains or soiled spots with a drop of dishwashing liquid. Allow the liquid to soak into the stain for 10 minutes. Then blot away as much of the soap as possible with a paper towel to lift the stain. Do not rub the stain because you may spread it or press it deeper into the fabric.
Wash
Place the blankets in your washing machine. To prevent abrasion with other clothes, it is best to wash fleece items together, combining colors. Before you begin, set the washer on the gentle cycle. Stronger washing cycles may cause the fleece to form knots.
Use only warm, not hot, water on the fleece. Add laundry detergent to the washing machine, but do not use a laundry detergent that contains bleach. It’s also a good idea to avoid fabric softeners when washing fleece because they will damage the water-repellent finish applied to many fleece items during manufacturing.
Dry
Tumble dry fleece blankets on the gentle cycle with low heat. Never use a high heat setting on fleece blankets, as it will damage the fabric. Remove the blankets immediately after the dryer stops and fold them to prevent wrinkles. If the blankets are too fluffy, lay them on a flat surface and press them down with your hands.
Make sure to never iron fleece blankets. Irons will melt the synthetic fabric and leave marks on the fleece. If you can and weather permits, consider changing your fleece blankets outdoors to dry for a fresh smell.
Store
If you are storing your fleece blankets after washing them, fold them neatly and place a scented dryer sheet inside the last fold. It will keep the blanket fresh while it will be stored in the closet.
Now, you know how to wash and tie a fleece blanket, let’s move to the other half of this article to tie a fleece blanket.
Best Embroidered Fleece Blanket
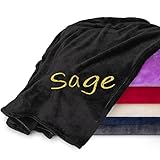
- SNUGGLE UP IN SOFTNESS & WARMTH – Thanks to its silky-smooth texture and cloud-like feel, our large fleece blanket is super soft to give you a warm, cozy feeling in winter. It is perfect for snuggling up on your couch while enjoying a hot cup of coffee or watching your favorite TV show.
- CUSTOMIZE TO ADD A PERSONAL TOUCH – Put your embroidered name or any other text on cool blanket to make it more special for you. Simply click on "Customize Now", provide the custom text along with font style and color, we will get it done for you.
- STAYS WITH YOU FOR YEARS – This versatile fleece throw blankets are made of durable, fade-resistant, and anti-shedding microfiber polyester fabric. It will go beyond your expectations and will keep looking new after many washes.
- ENHANCE YOUR BEDDING & HOME DECOR – Our custom blanket is simple but elegant to add a classy touch to your bedding and home decor. Available in 2 sizes and multiple colors, choose the size that fits perfectly on your bed, couch, or anywhere in the house you want some extra coziness.
- PERSONALIZED GIFT FOR YOUR LOVED ONES – Our personalized blanket for adults makes a great gift for your loved ones on various occasions like housewarming, Valentine’s Day, Mother’s Day, or Father’s Day. They will love to see their name on this lovely blanket!

- Customize Your Blanket - Please choose your favorite blanket color. Then, click "Customize Now" to add your name to get a unique personalized blanket.
- Cozy and Comfortable - This soft throw blanket is an all season must-have for a deep sleep. Customized stylish cozy blanket makes the perfect addition to any couch, home, dorm room, living room or teenage bedroom! These are great comfort in the living room on the course or on the bed for those chilly nights. Take one outdoors and see just how warm the premium sherpa keeps you.
- Perfect Gift for Families - Blanket comes with monogram or name embroidered on the corner of the blanket. This embroidered touch on our luxurious throw will make this blanket special and unique to your loved ones, it will be the most thoughtful gift. You can use as a decorative nursery room accent or a soft cushion - perfect for tummy time, or as a daily blanket. You can also create a warm, loving and caring blanket gifts for cancer patients, after surgeries or as recovery gifts.
- Easy to Care For & Durable - Personalized with any name to commemorate special events and priceless moments such as weddings, birthdays, housewarmings, baby showers, Mother's Day, Father's Day, Thanksgiving, Christmas, Baptism, Christening etc. with your friends and family. Luxurious, silky, cozy, ideal for snuggling, easy to care for and durable, holding up well to frequent use and laundering.
- Machine wash cold. With like colors. Only non-chlorine bleach. Tumble dry low. Do not iron. | Dimensions: 50"w x 60"h

- SNUGGLE UP IN SOFTNESS & WARMTH – Thanks to its silky-smooth texture and cloud-like feel, our large fleece blanket is super soft to give you a warm, cozy feeling in winter. It is perfect for snuggling up on your couch while enjoying a hot cup of coffee or watching your favorite TV show.
- CUSTOMIZE TO ADD A PERSONAL TOUCH – Put your embroidered name and initial monogram on cool blanket to make it more special for you. Simply click on "Customize Now", provide the custom text along with font style and color, we will get it done for you.
- STAYS WITH YOU FOR YEARS – This versatile fleece throw blankets are made of durable, fade-resistant, and anti-shedding microfiber polyester fabric. It will go beyond your expectations and will keep looking new after many washes.
- ENHANCE YOUR BEDDING & HOME DECOR – Our custom monogrammed blanket is simple but elegant to add a classy touch to your bedding and home decor. Available in 2 sizes and multiple colors, choose the size that fits perfectly on your bed, couch, or anywhere in the house you want some extra coziness.
- PERSONALIZED GIFT FOR YOUR LOVED ONES – Our personalized blanket for adults makes a great gift for your loved ones on various occasions like housewarming, Valentine’s Day, Mother’s Day, or Father’s Day. They will love to see their name on this lovely blanket!
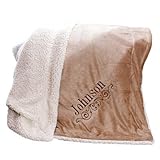
- Personalized With Name or Monogram -- Add your recipient's name, monogram, or title in your choice of font color
- 50 x 60 Inch Size is Large Enough to Share -- Right Size to Share - This sherpa blanket is just the right size for two to share
- Warm, Cozy Material -- One side is made of luxurious faux Micro Mink; the other side features cozy faux lambs wool Sherpa
- Easy to Clean -- Keep this embroidered 100% polyester blanket clean and looking new by simply throwing it in the washing machine
- Makes a Thoughtful, One-of-a-Kind Gift -- A cozy, custom blanket can function as a great gift for virtually any occasion or recipient

- Package Included: you will receive totally 12 pcs flannel fleece throw blankets bulk, each size is 50 x 60 inches, our throw blankets are made with flannel fabric, sufficient quantity can support your daily use and replacement needs, you can easily choose the fleece blanket suitable for your home decor
- Warm Soft: flannel blankets are made of comfortable quality flannel fabric, soft and skin friendly, a blanket that makes you feel in a warm embrace, the double sided design brings you a better touch, one side is smooth, hand feels delicate, the other side is plush, plush blanket hand feels soft and can lock the warmth, warmer than usual blanket
- Suitable for Different Season: our coral fleece blankets are nice for adding a layer of warmth during a cold winter, and are lightweight enough to use during a chilly spring evening, coral fleece throw blankets are a comfortable and cheerful way to keep the whole family and friends warm while gathering outside during the party
- Machine Washable: these warm fleece blankets for couch are easy to keep clean, machine wash in warm water with other polyester fleece blankets (no more than 120 Fahrenheit), use mild detergent, you can place them in the washing machine and tumble dry on low heat, durable and wrinkle resistant, blankets are made for easy living
- Widely Application: soft and cozy throw blanket allows you to take a cozy nap in office, on cold nights, you can lie on the sofa and watch TV with a warm blanket, when you travel, a blanket in your suitcase is lightweight and practical, which can also be applied as a summer air conditioning blanket, children's crawling blanket or pet blanket

- Something Special for Your Child: The AleMir Fashion personalized baby blankets for girls and boys are a dream come true for parents who want to make their kid’s first years a wonderful time of memories.
- 100% Customized: The embroidered baby blanket is personalized with your child’s name and birth date so you can cherish a truly unique accessory forever.
- A UNIQUE GIFT: The perfect baby shower gift idea that will make everyone smile? Then this is definitely for you! Offer this plush and comfortable baby blanket in a choice of an array of colors and make the moment unforgettable.
- Lovely Gift: If you are on the search for some unique and luxurious monogrammed baby gifts, then our monogrammed blanket is the answer! Surprise new parents with a lovely accessory they can keep for many years to come.
- Effortless Process: Customizing these personalized blankets baby is easy and effortless. All you must do is provide us with the name and birth date of your child and we will take care of the rest.

- Custom Embroidery Options: Personalize your blanket with your choice of thread color, initials, names, or monograms, creating a one-of-a-kind keepsake and a memorable personalized gift.
- Elegant and Thoughtful Gift: This personalized fleece blanket makes the perfect personalized gift for Valentine’s Day, birthdays, or any special occasion, adding a heartfelt touch with custom embroidery.
- Luxurious Design & Size: Sized at 60''x80'' (Twin Size) and available in stunning colors like Mocha Brown, Grey, Cream, Dusty Pink, and Navy, personalized to reflect your unique style and make a cherished personalized gift.
- Precision Craftsmanship: Expertly embroidered to ensure durability and attention to detail, your personalized blanket will be cherished as a high-quality personalized gift for years to come.
- Versatile Use with a Personal Touch: Perfect for bed, sofa, couch, travel, or camping, this cozy soft blanket with personalized embroidery combines practicality with elegance, making it an ideal personalized gift.

- Introducing our cartoon Sherpa throw blanket – the ultimate comfort companion for your little sweatheart. This cozy and soft blanket boasts a vibrant 3D-embroidered cartoon design on one side, while the reverse features soft sherpa fleece for warmth on chilly nights.
- Adding a fun touch to bedrooms, playrooms, and any occasions. It's perfect for cuddling, movie nights, or as a decorative addition. Little ones will love the feeling of safety and warmth that comes with their favorite cartoon character.
- Made with high-quality materials, our cartoon Sherpa throw blanket is soft, durable, and built to withstand the adventures of childhood. Your child will treasure this blanket for years to come.
- Select the perfect size for your child: 40''×50'' or 50''×60''. Whether it's a toddler, teenager, or even an adult, this blanket offers a snug and warm embrace for everyone in the family.
- Throw blanket can be tossed into the washer without concerns about fading, and it will maintain its vibrant colors and softness.

- BETSEY JOHNSON HOME: Boldly designed bedding collections inspired by Betsey Johnson's iconic and whimsical style. Our products blend vibrant patterns with luxurious comfort, adding a touch of fun and creativity to your living space. Transform your bedroom with our unique and expressive pieces that bring color and joy into your home every day.
- FABRIC DETAILS: Made with 100% plush fleece, this blanket is both oversized and lightweight for year-round comfort and coziness.
- FEATURES: Folded end hems for a clean finish with addition of a Betsey Johnson woven logo label; Lightweight and cozy- perfect layering piece for your bedding ensemble
- DIMENSIONS: 90"L x 60"W
- CARE: Machine wash cold, tumble dry low

- 【Cozy & Warm Sherpa Fleece Blanket】:One side is 240GSM soft flannel, and the other is 230GSM high premium sherpa fleece. The two layers in the middle are laminated together, which makes it just like one single layer and not too heavy. Double fabric give you double warmth. Especially on cold winter nights. It also not easy to shrink, harden or shed after washing.
- 【Eye-catching Checkered Bed Throws】:Here come staggered grids in gray, cream and soft blue, then match with soft plush flannel fabric. Fashionable but elegant, classic but popular, not only can add comfort and warmth to you, but also a great decor for your home. Besides, excellent printing and dyeing technology makes it not easy to fade after multiple wash.
- 【Throw Blanket Size】:Normal size,measures 50"x60". Suitable for indoor and outdoor use, like watching TV on sofa on cold winter days, working as bed sheet to add warmth, reading books on couch, camping, traveling outside and nap in the office, etc.
- 【Bed Blanket with Exquisite Workmanship】:The two layers in the middle are laminated together, and it’s about 2.3 pounds not too heavy. Lightweight and very convenient for many outdoor uses. Cozy flannel wrapped with thick fluffy sherpa on the edge, stylish and tidy, the stitches are smooth and not easy to broken.
- 【Machine Washable &Perfect Gift】:Simply machine wash separately on gentle cycle with cold water, tumble dry at low temperature. It's a great present choice for your friends, colleague and family for birthday, Christmas, Valentine's Day, Thanks Giving Day, wedding,etc.
How To Tie a Fleece Blanket?
Making a fleece blanket with a tied fringe edge is an easy no-sew project, especially for kids and teens. These inexpensive blankets are perfect for gifts or charity projects.
Whether you’ve purchased a kit or want to start with a few pieces of fabric, follow these directions to make a warm, no-sew tie blanket out of two pieces of fleece.
Moreover, you can use the instructions to make your blanket of any size. The techniques are all the same, just the fabric size changes. You can use the same method to make a no-sew pillow.
This blanket is an appropriate project for ages eight years and up. It will take only about 30 minutes from start to finish.
What You’ll Need?
- Rotary cutter
- Cutting ruler
- Cutting mat
- Ruler
- Pen or pencil
- Scissors
- One 1/2-yard anti-pill fleece
Instructions
Cutting the Materials
When you purchase fleece by the yard, it almost always needs to be trimmed and straightened. At the very least, you need to cut off the selvage edge.
Start by laying the fleece piece that will be the back of your blanket, right side down, on your work surface. It works best on a large area of the floor. Smooth out the piece of fleece with your hands.
Now, lay the fleece piece that will be the front of your blanket, right side up, on top of the first piece of fleece. Again, smooth out the piece of fleece, so it lies flat.
Cut through both pieces of fleece, trimming it to whatever size you want your blanket to be, and squaring up the edges. The cuts do not have to be perfectly even, but they should be relatively straight. Keep in mind that the finished blanket will appear about 10 to 12 inches smaller than the size you cut because of the fringe.
Measure and Cut the Blanket Corners
Measure a square at each corner that is the same length as what you want the fringe to be. The sample fringe is about 6 inches long, so the square is 6 inches from each side in the corner. You can adjust this if you’d like, starting with a square that is anywhere from 4 inches to 8 inches.
If you are using a rotary cutter, align the cutting ruler and cut the square. Also, If you are using a pencil and scissors, mark the lines for the square. Cut out the square with scissors.
Repeat this for each corner. Make sure that you cut through both layers of the fleece. Try to cut as straight as possible, but don’t worry about the lines being perfectly even. Once they are tied together, you will never notice any differences.
Cut the Blanket Fringe
Next, start making the fringe along each edge, cutting through both thicknesses of fleece. Each strip should be the same length as your starter square and anywhere from 1 inch to 2 inches wide. The sample is 6 inches long and 2 inches wide.
If you’re using a rotary cutter, use the ruler to measure and cut the strips, working around the entire blanket.
If you’re using scissors, measure and mark all the fringe lines first. Then go back and cut the marked lines. It will help keep the cuts straight.
Depending on your blanket’s size, the fringe cuts may not come out even on their own. You don’t want a tiny or huge strip at the end. To fix this, when you get about 18 inches from one end, measure how much is left to mark or cut. If the strips’ width doesn’t go into that length evenly, adjust the strips’ width slightly.
For example, if you have about 15.5 inches left, start making the fringe just a tiny bit narrower. Measure again after a few strips to be sure that the fabric divides evenly now.
Tying the Fringe
To attach the top piece of fleece to the bottom part of fleece, tie the fringe together. Hold a set of fringe pieces (a back and front piece), and tie a square knot.
Tie each knot, so it is tight, but try not to pull at the fabric too much.
Continue tying the pieces of fleece together until you have worked your way all around the fleece blanket. Now the fleece blanket is washed and tied.
You can also read the followings:
Why Doctors & Scientist Wear Lab Coats?
Parts of Chef Coatshttps://www.crookedbrook.com/custom-embroidered-fleece-blankets.htm